Major General Charles Howard Foulkes is perhaps best known for his role as General Officer Commanding of the Special Brigade responsible for Chemical Warfare and as Director of Gas Services during World War One. However, earlier in his military career, his most notable successes and innovations came in the field of conflict photography. When given just five days to organise a photographic reconnaissance section before heading out to the Second Boer War he oversaw the construction of two special bicycles that could carry equipment capable of taking several weeks’ worth of photographs (Liddell Hart Centre for Military Archives Foulkes 3/2, p.31). He also designed cameras that could be used ‘under cover’ for secret reconnaissance missions and in Martinique was arrested for possibly putting such methods into practice. Most of the papers and photographs related to Foulkes’ successful military career are held at the Liddell Hart Centre for Military Archives. This article will focus on the 1898 Hut Tax War, but Foulkes’ papers and photographs also cover the Boer War, the Anglo-French boundary commission, and World War One. Most interestingly, his archive contains an unpublished manuscript on photography in military reconnaissance.
It was when searching for images of the West India Regiment serving in West Africa that I first came across Foulkes’ photographs and writings on photography. The West India Regiments were recruited from black African and Caribbean populations in the British colonies and used to garrison tropical outposts of empire where the mortality rates of white British troops had been extremely high. Each battalion rotated between the Caribbean and Sierra Leone on a triennial basis. It was in Sierra Leone that Foulkes came into contact with the Regiment and captured them on campaign during the 1898 Hut Tax War against the Temne tribe. It soon became clear that Foulkes’ photographs and writings were useful far beyond their original purpose as evidence of representations of the West India Regiments. They give fascinating insights into the practice and purpose of conflict photography, as well as the logistics and consequences of the numerous ‘Small Wars’ fought by the British in their colonial territories.
Original photograph by Charles Howard Foulkes, courtesy of Tom Foulkes.
Little has been written about photographs of these Victorian wars of colonial expansion. Much of the focus of writing on early conflict photography focuses on Fenton’s images of the Crimean War and the commercial photographs of the US Civil War. At the time Foulkes was taking his Sierra Leone photographs, it was the Spanish-American War that dominated newspaper coverage. Unlike the larger wars mentioned, war correspondents were not attached smaller conflicts like the Hut Tax War, and there was not a commercial incentive for photographers to visit the areas and capture images. Instead, reports in the newspapers and illustrated press came from those involved in the conflicts (Daily Graphic, 1898). The photographic and written responses to the Hut Tax War predominantly came from those who were actually involved. It is important to consider therefore, as Joan Schwartz argues regarding photographs in general, that Foulkes’ photographs have particular ‘visual agenda[s]’ and are not completely objective (Schwartz cited in Rose, 2000). They serve his interests as a photographer and reflect his personal views, just as any written report from the front line would. It is for this reason, that Foulkes memoirs and photographs are such an insightful historical source.
Capturing ‘Conflict Photographs’ in Sierra Leone
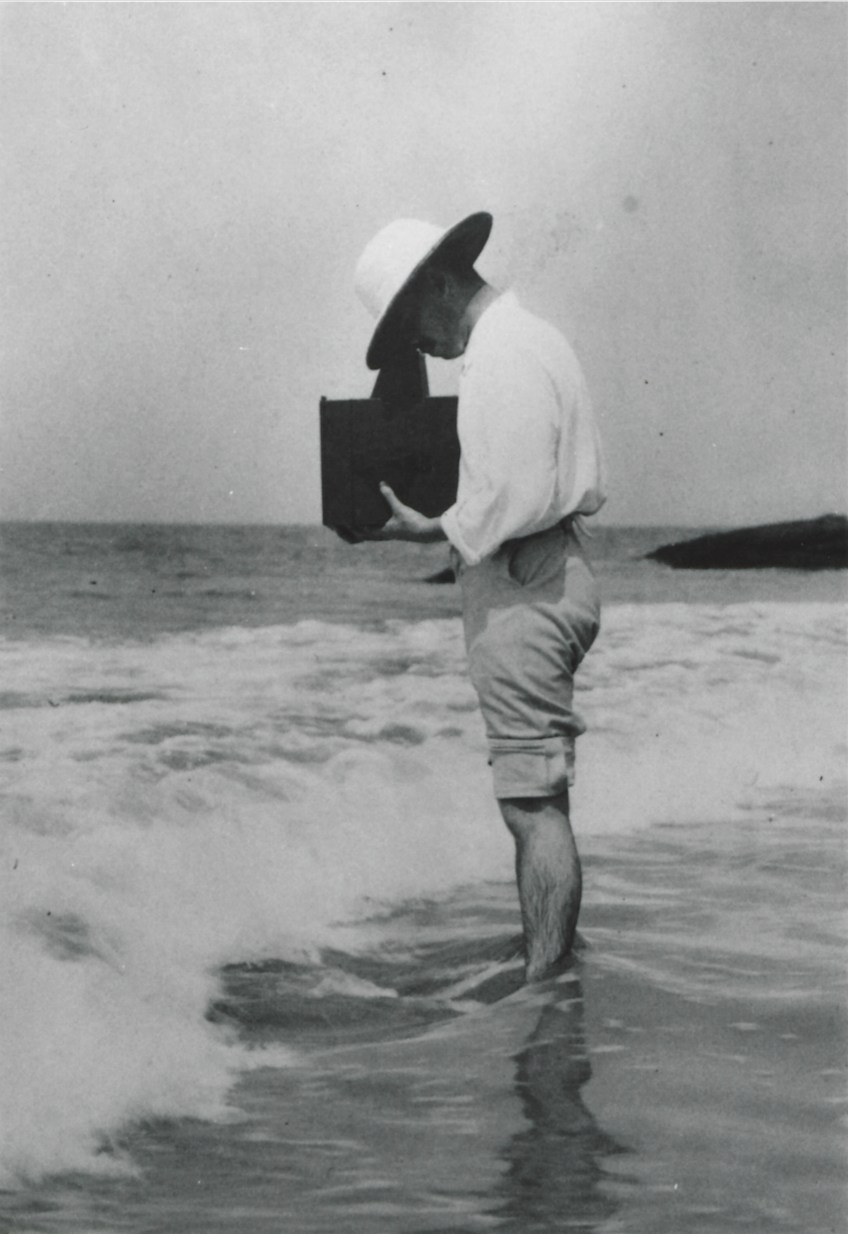
Foulkes was commissioned into the Royal Engineers as a 2nd Lieutenant in 1894. Soon after finishing training at Chatham he was sent on his first international posting to Sierra Leone to supervise the improvement of Freetown’s coastal defences. For Foulkes, the climate and remoteness of Sierra Leone presented specific challenges when capturing and producing conflict photographs. Access to photographic materials was restricted, particularly his preferred size of glass plate, and he was forced to adapt 12” to 10” plates sourced from a native photographer in Freetown using a glazer’s diamond. He was forced to carry all the supplies he might need on campaign from the beginning, and therefore employed a number of carriers including one for his camera that he believed was ‘rather bulky’(LHCMA Foulkes 4/1, p.19). This Newman and Guardia Twin Lens camera, selected by Foulkes as it allowed him to see his subjects at full size instead of through a finder, and to focus accurately, cost him around sixty pounds and served him well throughout his career (LHCMA Foulkes 4/1, p.19).

Photographs by the author
The conflict photographs Foulkes took whilst in Sierra Leone are organised into a single album, the final section of which is dedicated to conflict photographs from the Hut Tax War. The Hut Tax War describes a series of conflicts between British troops and the Temne, Sierra Leone’s largest ethnic group, that began in February 1898 (Alie, 1990). Photographs cover the assembling and instruction of carriers, the marching and transportation of troops to the conflict zones, the preparation of camps, the destruction left behind by British troops, and the graves of British casualties. They are similar in subject matter to most conflict photographs circulating at the time, with a focus on camp life and the logistics of conflict. However, what makes them different is the fact that we have Foulkes’ memoir and photography manual to give us insights into how he took the photographs and what he thought of those included in his photographs. It is worth discussing a few examples in detail.
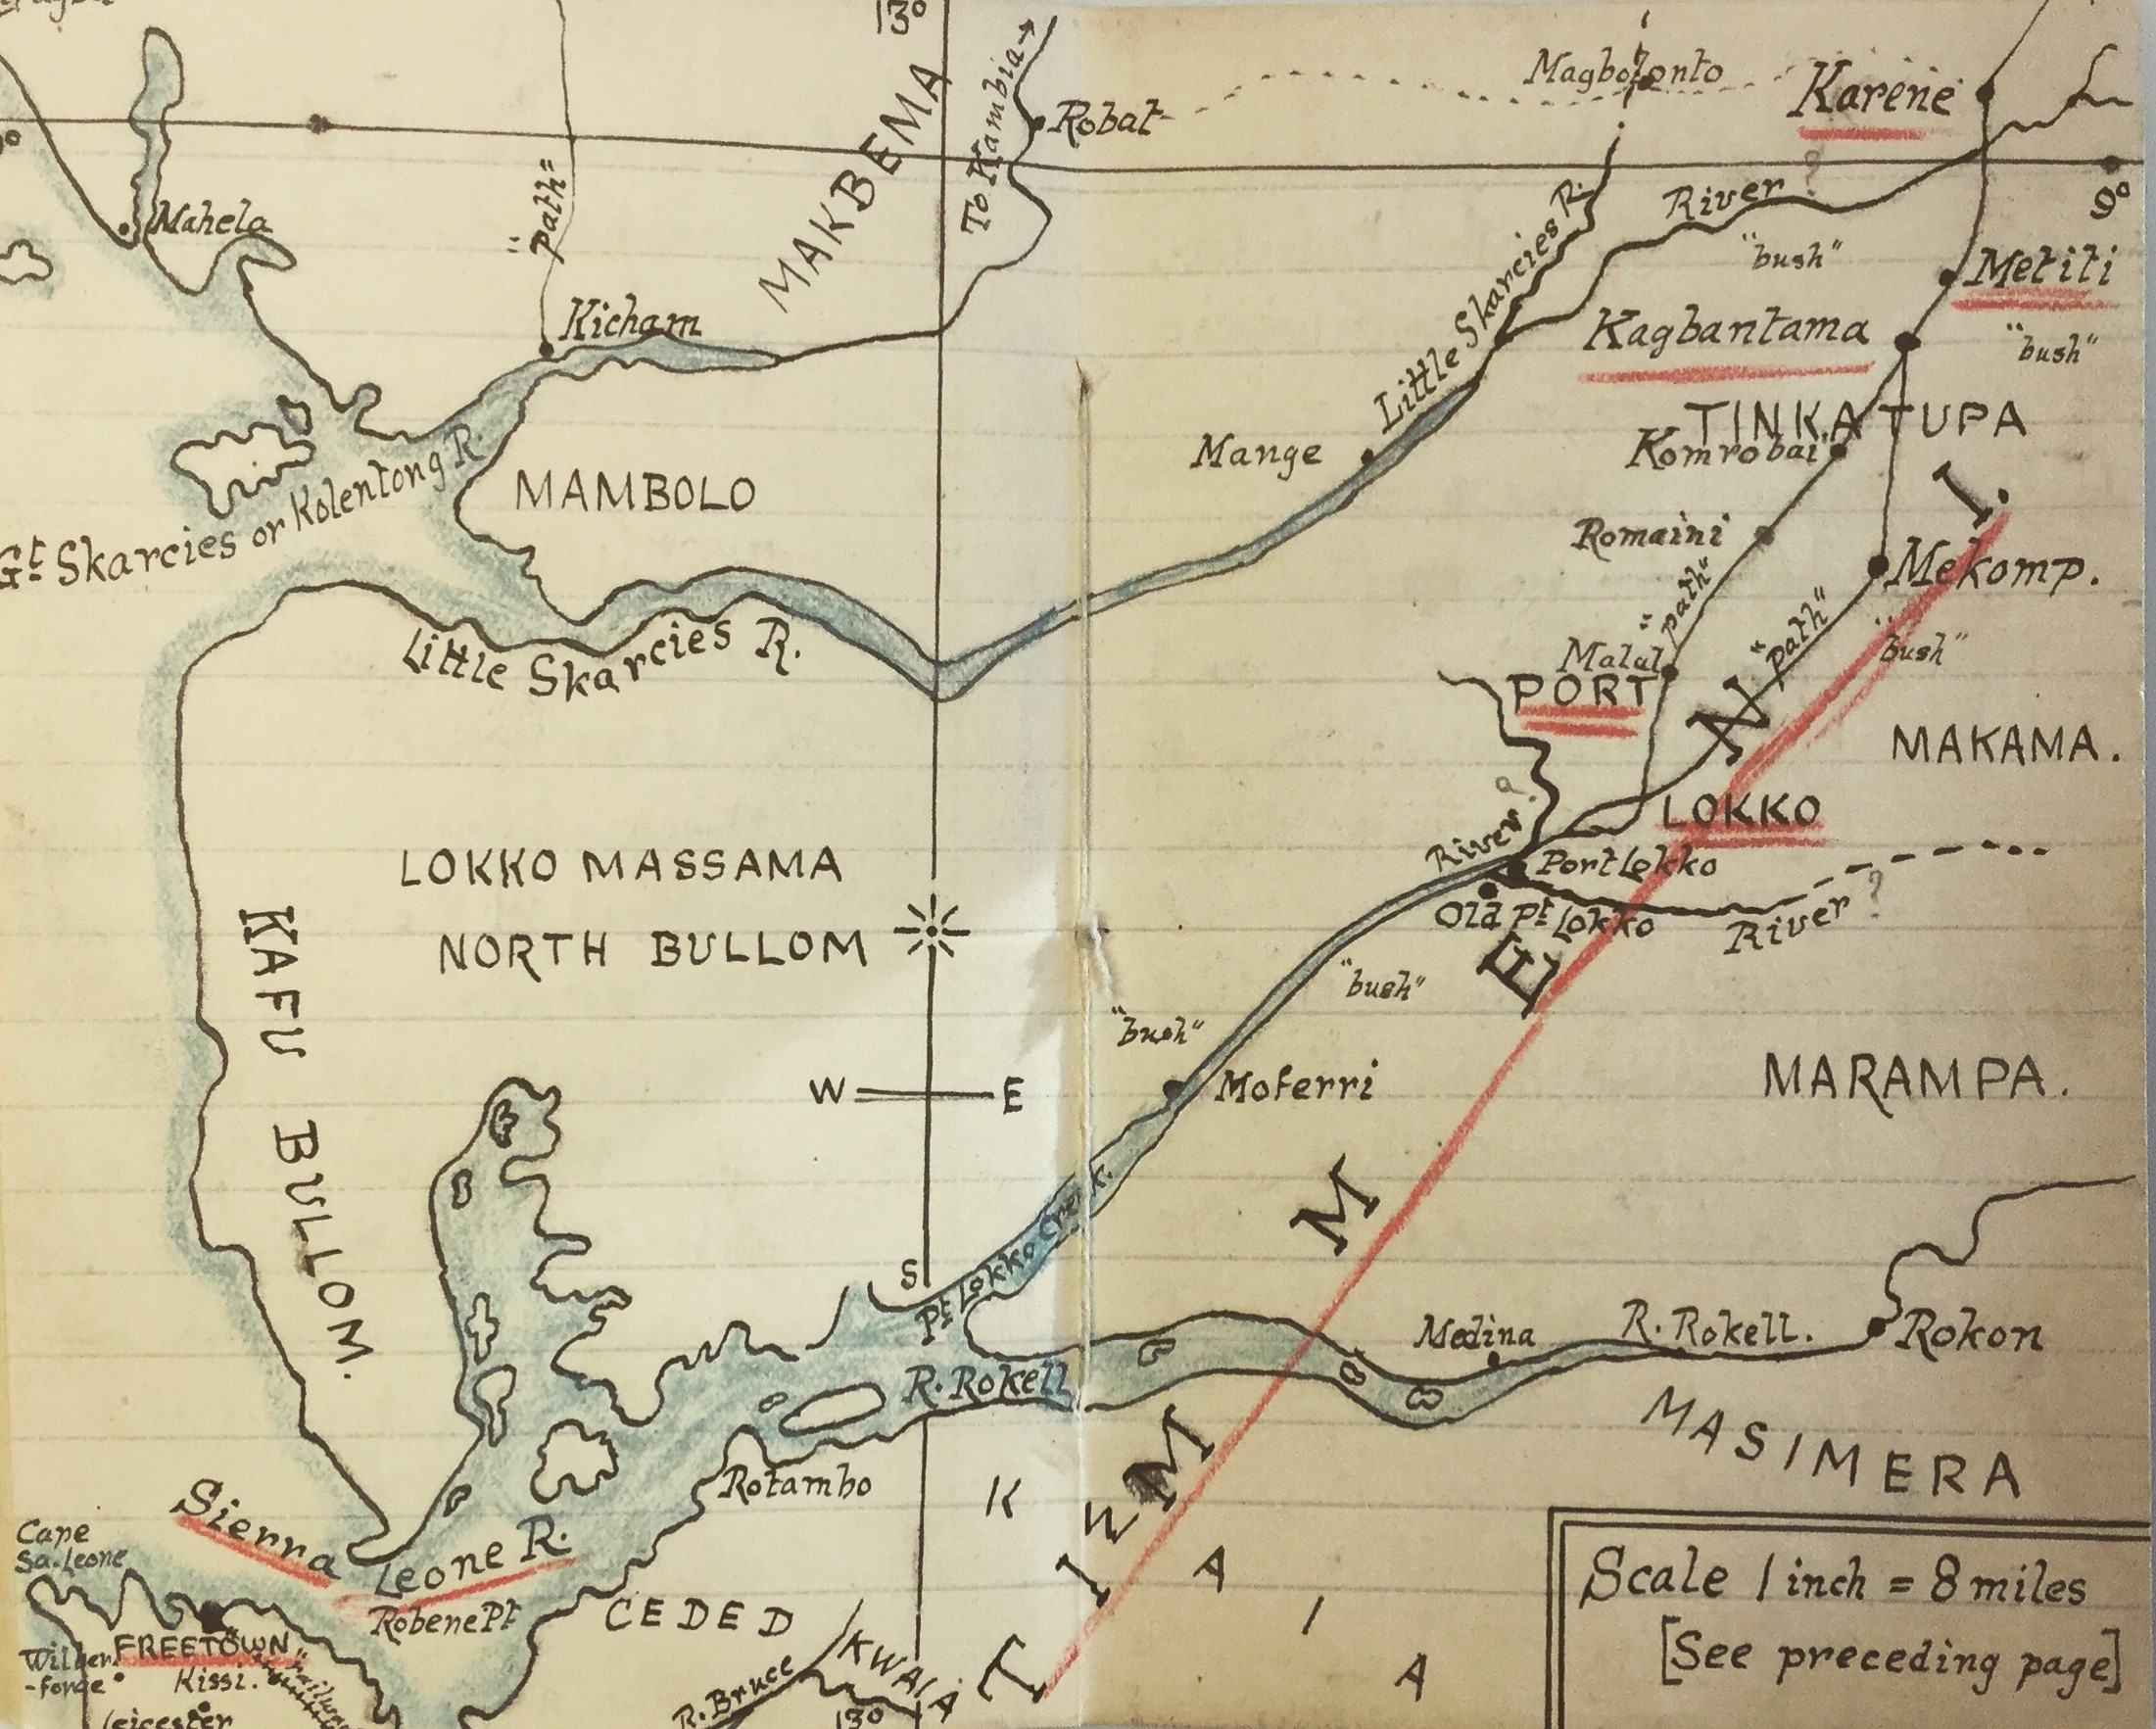
Map of the of the Karene district where most of the fighting took place from the diary of E Craig Brown of 2nd battalion, WIR who commanded the rear guard of H Company during the conflict (Imperial War Museum).
The Journey to Port Lokko
The transportation of WIR troops from Freetown to Port Lokko and other base camps was captured in a number of Foulkes’ photographs. In combining these photographs of marches with his memoirs we are able to gain an insight into his thoughts about the abilities of the West India Regiment privates that he was travelling with. In ‘W.I.R. marching to wharf’ the Regiment are seen marching down from the garrison to the wharf to travel towards Port Lokko by boat. The layout of the photograph seems to emphasise the untidiness of the Regiment. The top half of the photograph is very much composed of lines, the crowds line the streets and stand parallel to and perpendicular to the lines of the railway with the WIR marching in a line through the middle of the frame. The straighter and cleaner lines in the photograph allow us to assess the privates against the lines that they march amongst. Unlike the lines of the building and the railway their marching line is unclear and poorly defined. It breaks up at numerous points and blends and merges with the crowds.
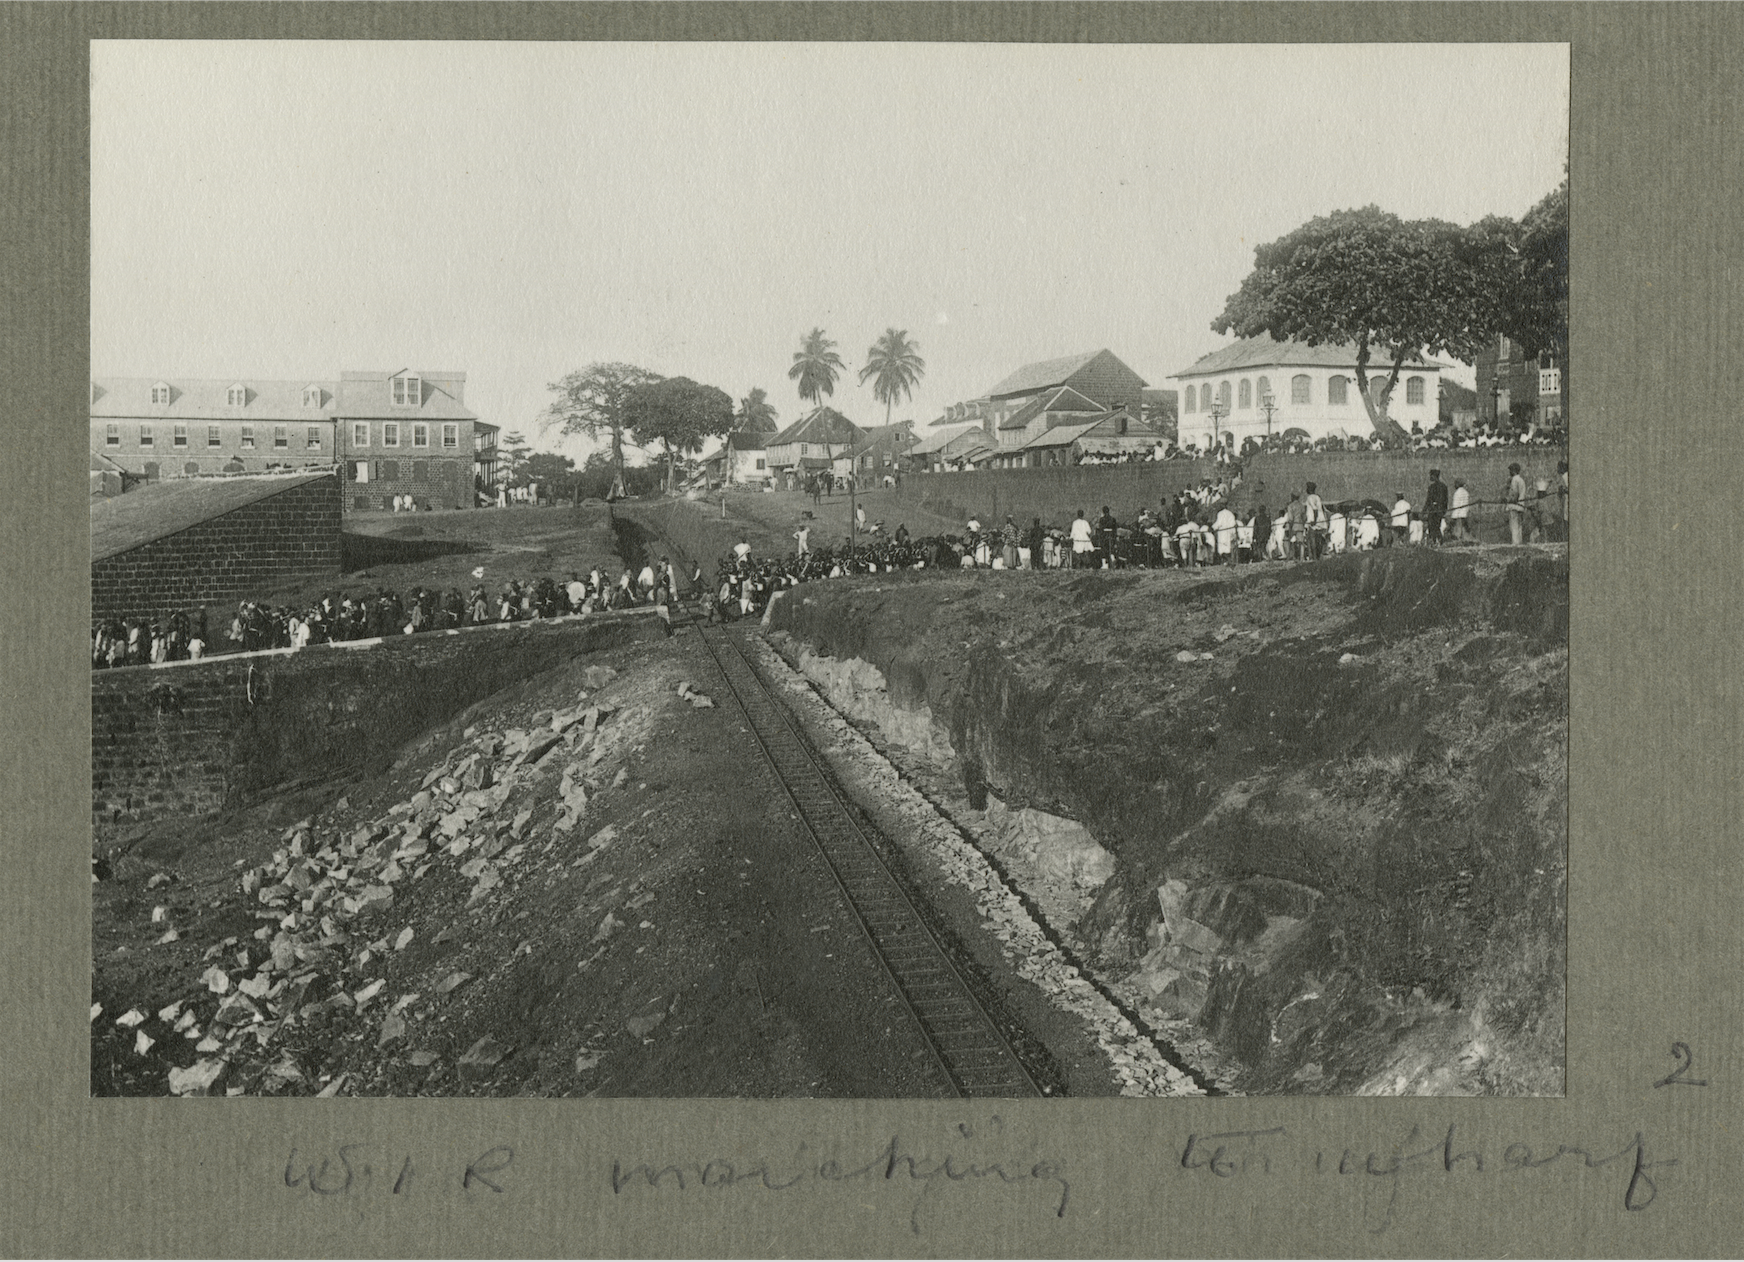
Original photograph by Charles Howard Foulkes, courtesy of Tom Foulkes.
Foulkes was unimpressed by the Regiment’s inability to hold formation, and in his memoirs comments on the lacklustre marching of the privates, stating that ‘they led an easy life in barracks and did little marching, so that they soon fell out on the way’ (LHCMA Foulkes 4/1, p.37). Another British officer, who was in charge of the rear guard of H Company of the Regiment during the Hut Tax Expedition, was also unimpressed with the marching and discipline of the WIR soldiers under his command. In a diary entry dated 22nd March 1898 E. Craig Brown described the difficulties he faced when as a result of falling behind the rest of the column, his section of troops came under attack from the enemy and were unable to fire back due to the fear of mistakenly hitting the rest of their convoy (Imperial War Museum). The lack of discipline highlighted in Foulkes’ photographs clearly had dire consequences in the field and led commanding officers to have low opinions of the martial qualities of some of the privates under their command.
The Destruction Caused by British Forces
Once Foulkes and the rest of the British forces reached Port Lokko they were arranged into flying columns to target and destroy offending villages in the Karene District. Up to 200 villages were destroyed by these flying columns during the campaign (C9391, p.288). The destruction of villages was widely believed to be an effective means of quelling unrest and making an example of those who supported rebellious groups in the West African territories. Colonel C E Calwell’s Small Wars advocated such behaviour and instructed that when ‘quelling an insurrection’ the object of any campaign should not just be to demonstrate military superiority but also to punish those who had taken up arms by destroying their villages and property. Such wanton destruction was presented as an essential means of ‘overawing’ the enemy to secure a lasting peace (Calwell, 1906). The destruction caused during the Hut Tax War is clear from Foulkes’ photographs of the village of Romani, which was effectively garrisoned by the British as an intermediate base after being destroyed. The creation of the base at Romani was achieved largely due to the assistance of Foulkes, who was given the role of fortifying the intermediate bases established during this time (LHCMA Foulkes 4/1, p.38).
In the first photograph we can see a building in Romani that has most likely been destroyed by large artillery. The supports for the lowest level of the structure are exposed and the material that likely surrounded them lies in a pile of rubble at the front of the structure. The ruins of the building make a statement about the consequences of rising up against the colonial government and demonstrate the superior power of European forces and weaponry. Although large artillery proved ineffective against the stockades constructed at the roadside and entrances of towns, and against the loose formations of bush warfare, they were devastating when aimed at buildings like the one photographed (Vandervort, 1998). In the second photograph we see the shell of a building that has been burned to the ground. This is clear to the viewer as the sides of the building are charred. To the right of the building’s shell is a low wall with a gate, most likely one of the entrances to the village. The desolation of the landscape portrayed in the image highlights its desertion by its inhabitants. Such evidence of abandonment by the enemy could also be seen as evidence of retreat, emphasising British success and victory.
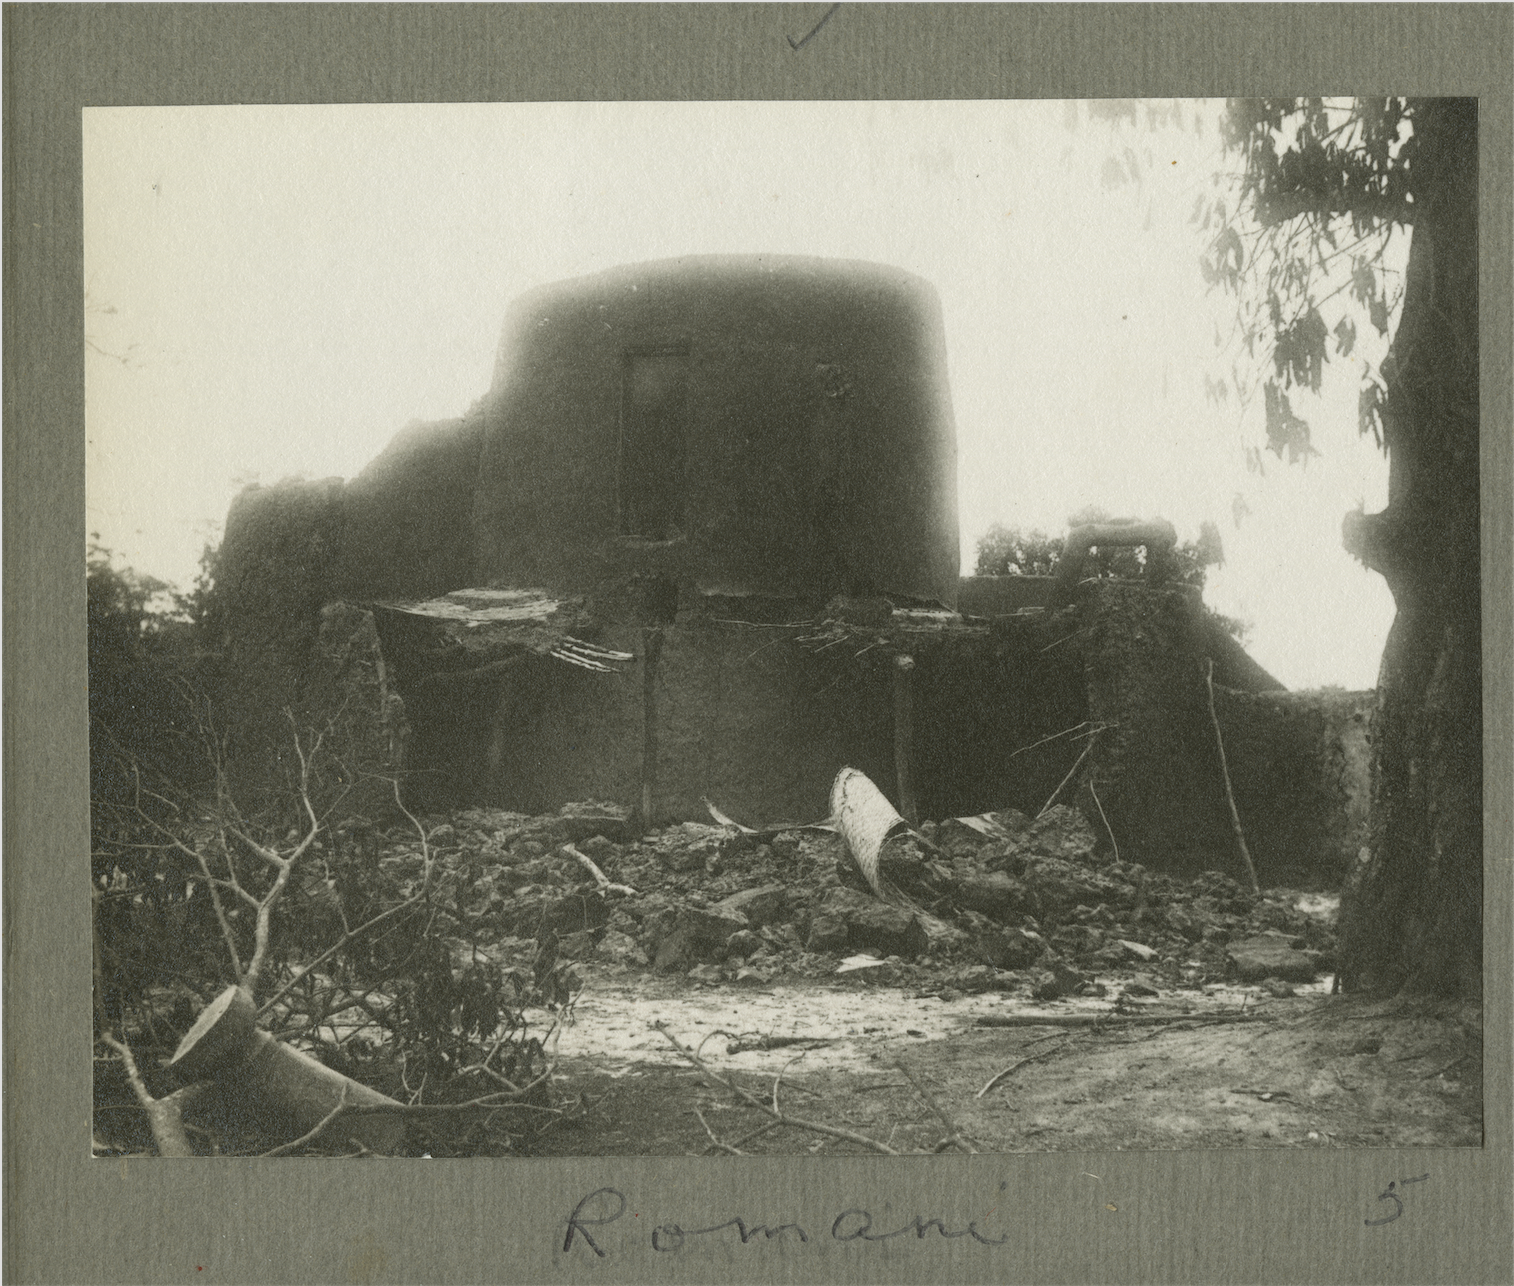
Romani.
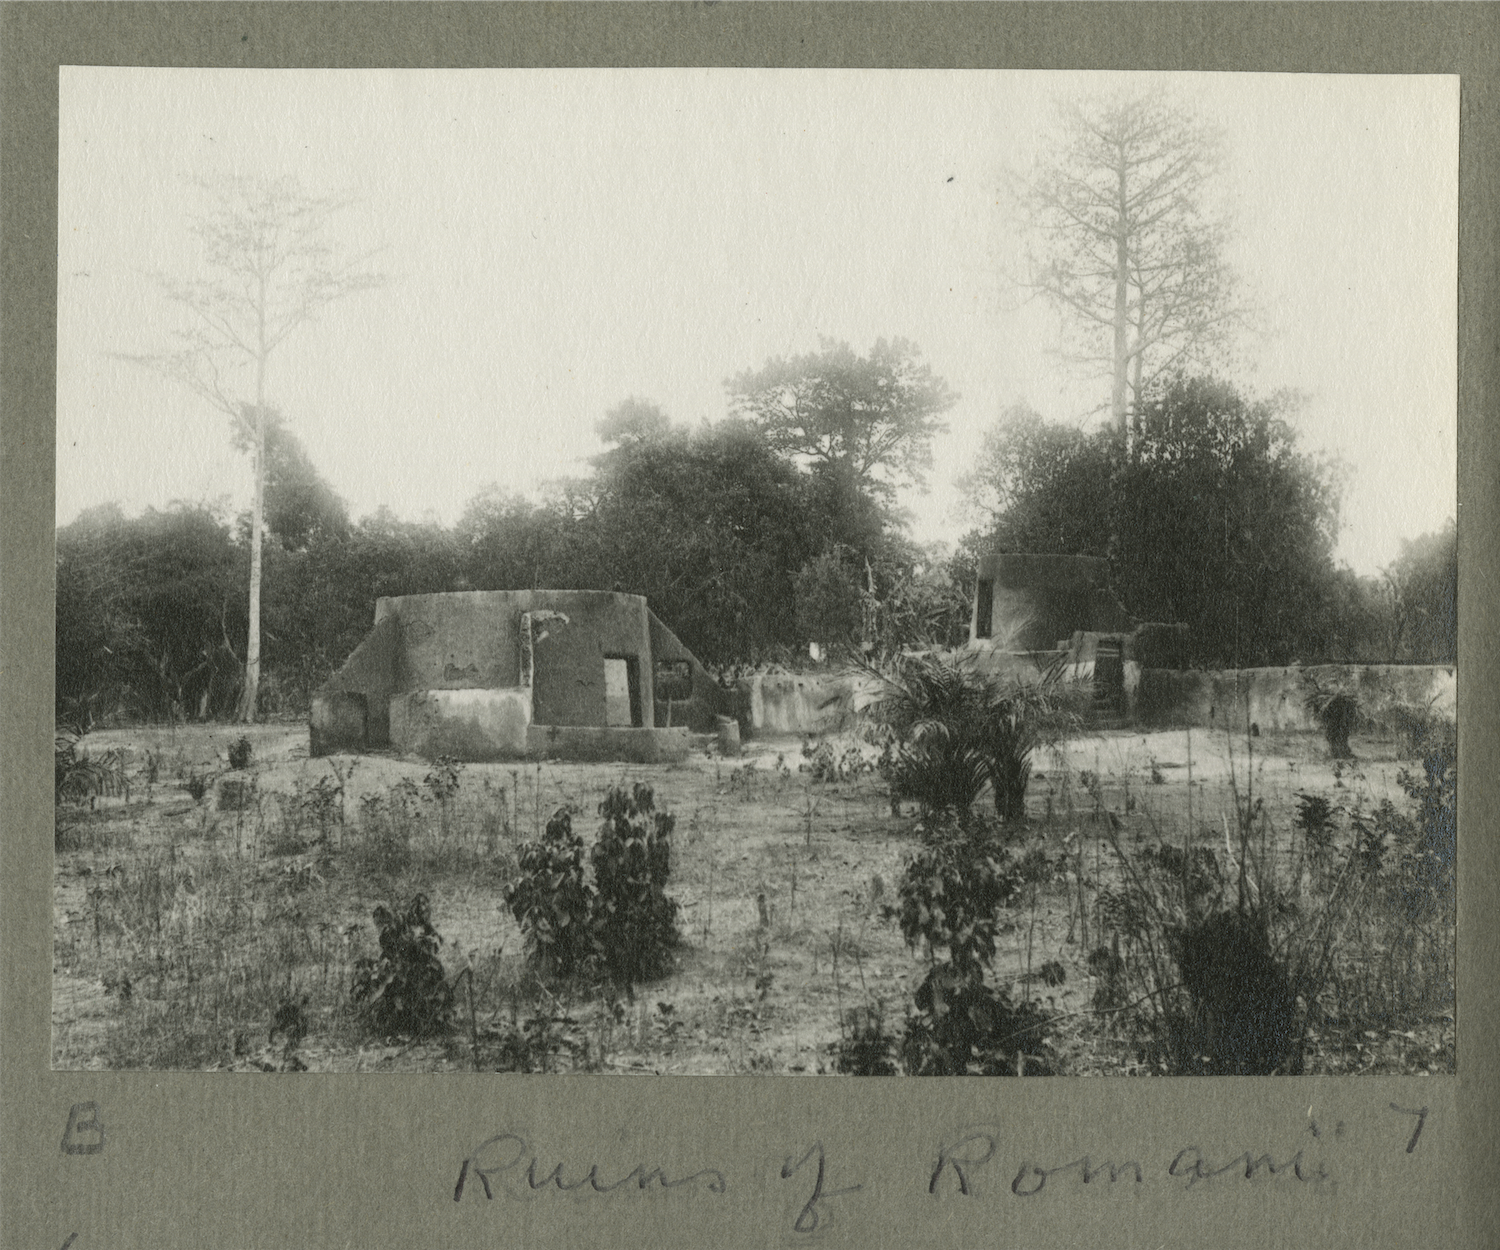
Ruins of Romani. Both photographs from Foulkes’ Sierra Leone Album. Original photographs by Charles Howard Foulkes, courtesy of Tom Foulkes.
When depicting the destruction of enemy villages, the layout of Foulkes’ album pages is important. In Raw Histories Elizabeth Edwards writes that in discussing what an image is of, the content is often the main focus. This has led to the material qualities of the image being neglected despite how images are presented, relating ‘directly to their social, economic and political discourses’ (Edwards, 2001). Considering this and analysing the whole album page that the images of Romani are presented on adds further meaning to the two images. Significantly separating these two photographs is a photograph entitled ‘Gloucester’ that depicts another Sierra Leonean village. Unlike Romani Gloucester looks lush, and its building is intact and welcoming. Gloucester makes the images of Romani look more dark and desolate. Through this visual arrangement Foulkes is highlighting the effect of the Regiment’s punishment on local villages by contrasting them to one that has not been subjected to such punishment. The destruction of Romani would have been particularly important for Foulkes to emphasise as Romani was the first location where government forces had been threatened and attacked by local people. Troops had subjected them to a barrage of jeers and stone throwing and armed men from the village had followed them for several miles until British officers finally decided to open fire in retaliation (Denzer, pp.44-45). The destruction of Romani was therefore an important act of revenge and display of British capability, especially for those officers who had initially been jeered at and deemed weak.
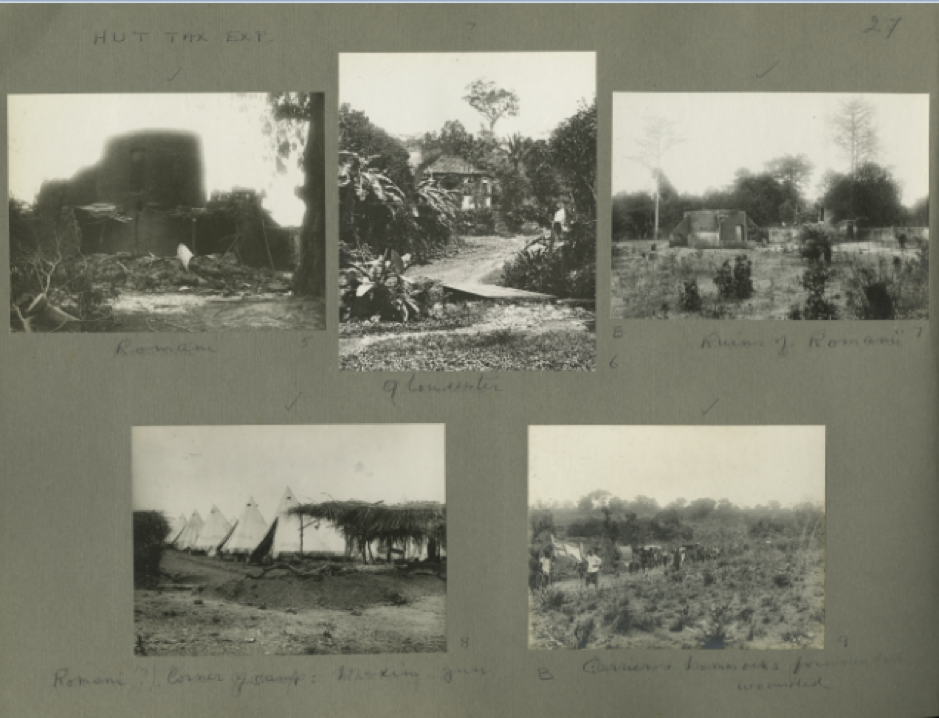
Full page with photographs of Romani and Gloucester. Original photographs by Charles Howard Foulkes, courtesy of Tom Foulkes.
Deaths Amongst British Troops
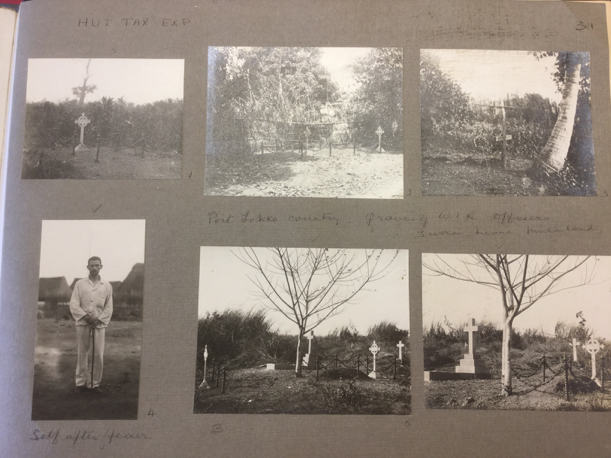
Original photographs by Charles Howard Foulkes, courtesy of Tom Foulkes.
From another of Foulkes album pages we can see that death and destruction were not only suffered by the local populations during Britain’s small colonial wars. During the Hut Tax Expeditions around Karene and Port Lokko a small number of officers and men were killed and Foulkes dedicated a full page to their graves at Port Lokko cemetery (London Gazette, 1899). Foulkes was personally involved in the construction of the graves four years after the war had ended. When traveling upcountry to choose a suitable location for a new garrison for the West Africa Regiment he was asked to take with him some monumental crosses and ornamental chain surrounds to erect for West India Regiment Officers who died in 1898, bringing him back to a location where he may have witnessed the deaths of his friends.
The men had not been properly buried until this time due to a belief that the local people would dig up and mutilate the corpses, believing that this would stop them passing into the next world (LHCMA Foulkes 4/1, p.130). His photographs of the graveyard are poignant and present his audience with the harsh reality that despite allegedly superior firepower, masculine qualities, and strategy, European officers were not guaranteed to return home from African campaigns. Furthermore, their bodies would not make it back home to their families, leaving them isolated and deserted in the African hinterland where they were vulnerable to attack even in death. It is clear from Foulkes’ decision to include a photograph of himself whilst unwell that he believed he too was at risk of dying whilst in Sierra Leone and feared a similar fate. By including this photograph of himself he acknowledges his own fears of mortality and his awareness of the risks he had taken in deciding to work and fight on the colonial frontier. This acknowledgement of fear and vulnerability contrasts greatly to most of the literature that circulated about these small wars, from adventure stories to reports in national and local newspapers.
Conclusion
Foulkes’ photographs of the Hut Tax War give us important insights into the practice of conflict photography and the consequences of colonial small wars for both the British forces and their foes. More importantly though, if we consider the way Foulkes arranged his album alongside his memoir and other writing about the conflict, his photographs can also reveal what those on the front line of these conflicts felt about those fighting alongside them, their opponents, and their own vulnerabilities.
After the Hut Tax War ended, the circulation of these photographs was limited. Foulkes did not submit his photographs to the newspapers, lamenting in his memoirs that the Hut Tax Rebellion received little of their attention. However, Foulkes did send copies of his photographs of the rebellion in an album to Sierra Leone’s governor, believing that he may be interested. The only feedback he received related to the title he had given them: a gentle rebuke that the rising was not caused by the Hut Tax (LHCMA Foulkes 4/1, p.40). It is therefore likely that the photographs went unseen, except within his personal networks until they were deposited in the archives at Kings College London and the Royal Engineers Museum ready to be discovered by researchers.
References
Alie, Joe A.D., A New History of Sierra Leone, (London, Macmillan, 1990).
Calwell, C.E., Small Wars: Their Principles and Purpose, (London, 1906).
C9391, Sierra Leone report by Her Majesty’s Commissioner and correspondence on the subject of the insurrection in the Sierra Leone protectorate 1898, Part II – Evidence and documents, (London, 1899).
Daily Graphic, 21st June 1898.
Denzer, ‘A Diary of Bai Bureh’s War: Part I’, Sierra Leone Studies, 23, pp39-65.
Despatch From Colonel Woodgate, Commanding Troops, to His Excellency the Governor and Commander-in-Chief, Sierra Leone, January 9 1899, printed in the London Gazette, 29 December 1899.
Edwards, Elizabeth, Raw Histories, (London, Bloomsbury, 2001).
Imperial War Museum, London, ECB 2/1 – Ms diary kept by ECB while serving with the WIR during the hut tax expedition in SL, pp35-37.
Liddell Hart Centre for Military Archives (LHCMA), London, Foulkes 3/2, Annotated typescript of Photography in Military Reconnaissance.
LHCMA, Foulkes 4/1, Draft and working papers for the unpublished memoir Adventures of an Engineer Subaltern.
Rose, Gillian, ‘Practising photography: an archive, a study, some photographs and a researcher’, Journal of Historical Geography, 26, 4 (2000) p555–571.
Vandervort, Bruce, Wars of Conquest in Africa, 1830-1914, (London, UCL Press, 1998).
Further Reading on E-International Relations
- Chaos and Corruption in West Africa: Lessons from Sierra Leone
- Conflict Psephology Amidst the 2022 Bosnian General Election
- Cyber Power and The Return of Major War
- Opinion – Estonia’s Kaja Kallas for NATO Secretary-General?
- Is the Conflict in Anglophone Cameroon an Ethnonational Conflict?
- Rethinking Deterrence in Gray Zone Conflict